|
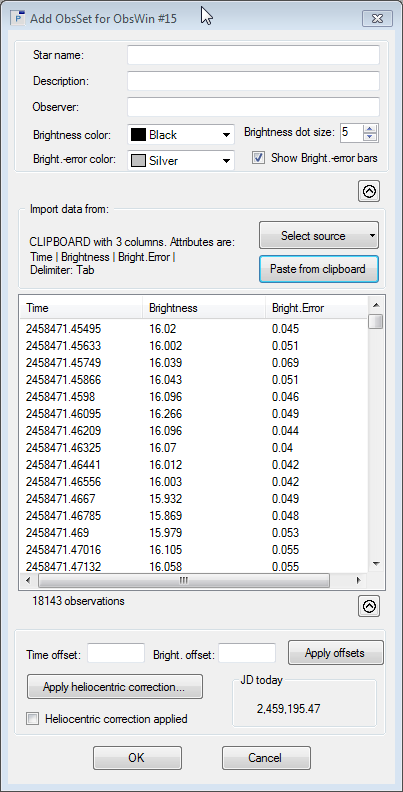
The Add observation set dialog box is used to create a new Observation set and to add it to the ObsWin. It has been introduced in Tutorial 3.
The Add observation set dialog box will be populated with observations that you either import from File or from the Windows Clipboard. Once populated, you transfer the observations to the ObsWin by clicking the OK button.
- To import observations from File click, click the small triangle of the Select source button in the Import data from section. It allows you to either use the Clipboard or a File as import mechanism. Click on the File item, which brings up another menu, offering to choose from a User defined format or from some predefined file formats. If you select a User defined format, you will have to describe the structure of the file to Peranso using the User defined format dialog box. If you use a predefined file format, this step is not needed and you can immediately import the data from the corresponding file in the Add observation set dialog box using the Import from file button.
- To import observations from the Windows Clipboard, click the small triangle of the Select source button in the Import data from section and select Clipboard. It brings up the Clipboard format dialog box which allows you to describe the structure of the clipboard to Peranso.
We here present the fields of the Add observation set dialog box, which have not been covered in Tutorial 3. You will see that there's a small button with a downward pointing arrow at the top of the Add observation dialog box. Likewise, there's a similar button just above the OK and Cancel buttons. Press both buttons to open additional sections of the dialog box.

We will now explain the upper section of the dialog box.
- Star name: an optional text field that allows to enter the name of the variable. It is added to the ObsSet properties and will appear as title in the ObsWin when you click the OK button.
- Description: an optional text field that allows to enter an additional description of the ObsSet.
- Observer: an optional text field that allows to enter the name of the observer(s).
- Brightness color: a drop down menu with a set of predefined colors. The selected color is used to draw the observations.
- Bright. marker size: an up-down field with predefined values. The selected value defines the size of the observation marker (circle, square or triangle), drawn in the ObsWin.
- Bright. error color: this field is only active if the data source (File or Clipboard) contains Brightness Error values. It is a drop down menu with a set of predefined colors. The selected color is used to draw the brightness error bars.
- Show Bright. error bars: this field is only active if the data source (File or Clipboard) contains Brightness Error values. If enabled, observations will be drawn with brightness error bars.
Finally, let's now have a look at the lower section of the dialog box.
- Time offset: once the ObsSet has been imported in the Preview table of the dialog box, you can use this field to indicate a constant time correction to be applied to the Time values displayed in the Preview table. Click Apply offsets to apply the correction.
- Bright. offset: once the ObsSet has been imported in the Preview table of the dialog box, you can use this field to indicate a constant brightness correction to be applied to the Brightness values displayed in the Preview table. Click Apply offsets to apply the correction.
- Apply offsets: applies the defined Time offset and Brightness offset values to the observations in the Preview table.
- Apply heliocentric correction: click this button to apply an heliocentric correction to the time values displayed in the Preview table, using the Star identification form.
- Heliocentric correction applied: enable this check box if your observations already were heliocentric corrected before import. Peranso automatically enables this check box if you execute the Apply heliocentric correction command.
- JD today: this is a read-only field displaying the current Julian Date
|
