|
The ObsSet Properties dialog box contains two tabs, labeled Edit fields and Info fields and four buttons:
- Buttons
- OK: if you make modifications to any of the Edit fields (see below), they will become effective once you click the OK button. The ObsSet will be redrawn to show the changes. This closes the Properties dialog box.
- Apply: identical to the OK button, but the Properties dialog box remains open.
- Delete: deletes the selected ObsSet. This can not be undone.
- Cancel: closes the Properties dialog box without further action.
- Edit fields
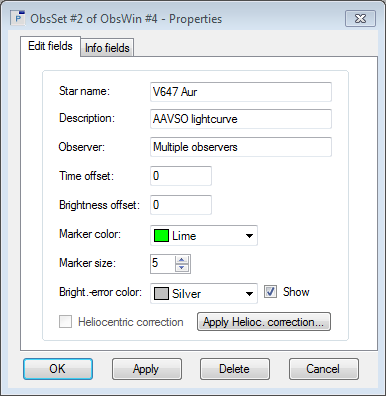
This tab consists of following fields:
- Star name: an optional text field that allows to enter the name of the variable. It will appear as title in the ObsWin when you click the OK button.
- Description: an optional text field that allows to enter an additional description of the ObsSet.
- Observer: an optional text field that allows to enter the name of the observer(s).
- Time offset: use this field to enter a time correction value to be applied to the Time values of the observations of this ObsSet.
- Brightness offset: use this field to enter a brightness correction value to be applied to the Brightness values of the observations of this ObsSet.
- Marker color: a drop down menu with a set of predefined colors. The selected color is used to draw the observations of this ObsSet.
- Marker size: an up-down field with predefined values. The selected value defines the size of the observation marker (circle, square or triangle), used for drawing the observations of this ObsSet.
Note: if you have set a fixed marker size in the Miscellaneous tab of the Settings dialog box, changing the Marker size in the current Properties dialog box will have no effect.
- Bright. error color: drop down menu with a set of predefined colors. The selected color is used to draw the brightness error bars of observations in this ObsSet.
- Show: If enabled, observations will be drawn with brightness error bars.
- Heliocentric correction: if the observations in the ObsSet have already been heliocentric corrected, the checkbox will be ticked. In that case, the button next to this field is named "Undo Helioc. correction". If the observations in the ObsSet have not yet been heliocentric corrected, the checkbox will not be ticked. The button next to it is then named "Apply Helioc. correction".
- Undo Helioc. correction: this brings up the Star identification form. Once you have entered the coordinates of the corresponding object, click the Start heliocentric correction button in the Star identification form. The form closes and the Heliocentric correction checkbox will no longer be ticked. The button changes to Apply Helioc. correction. Note that the Undo Helioc. correction is effectively applied if you click the OK or Apply button of the Properties dialog box.
- Apply Helioc. correction: this brings up the Star identification form. Once you have entered the coordinates of the corresponding object, click the Start heliocentric correction button in the Star identification form. The form closes and the Heliocentric correction checkbox will be ticked. The button changes to Undo Helioc. correction. Note that the heliocentric correction is effectively applied if you click the OK or Apply button of the Properties dialog box.
- Info fields
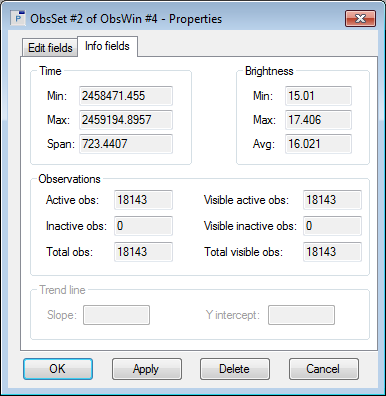
This tab is explained in Tutorial 3. None of the entries in this tab can be modified.
|