- Select New in the File menu (or click on
 in the main Toolbar) to open a new Observations Window (ObsWin). This brings up an empty ObsWin in the Peranso Desktop. in the main Toolbar) to open a new Observations Window (ObsWin). This brings up an empty ObsWin in the Peranso Desktop.
- The toolbar of the ObsWin contains several buttons. Click on
 (Add Internet light curve). This brings up a menu. Select the (Add Internet light curve). This brings up a menu. Select the  Kepler light curve entry to display the below dialog box. Kepler light curve entry to display the below dialog box.
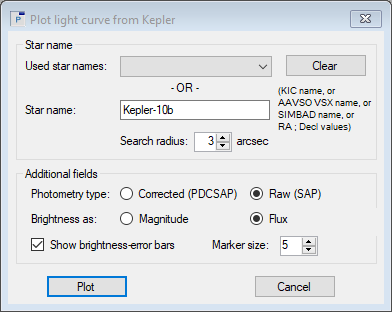
- This dialog box contains 2 sections: Star name and Additional fields:
- In the Star name section, there's an empty field labeled Star name. You can enter Star names in 4 ways:
- If you know the Kepler KIC name of the object, you can enter it here.
- You can also enter the AAVSO VSX or SIMBAD name of the object. We enter Kepler-10b for this tutorial.
- Or you can enter (J2000.0) RA and Decl coordinates. Both values have to be separated with a semi-colon. RA and Decl need to be in sexagesimal format with values separated by spaces. So, a valid entry would be: 04 59 13.57; -69 35 43.3
- Or you can enter (J2000.0) RA and Decl coordinates, expressed in degrees and separated with a semi-colon. Example: 76.80654; -69.595361
The field Used star names recalls the Star name you entered for each successful Kepler search. It makes it more convenient to repeat searches in the future. Click the Clear button to erase all entries in the Used star names field.
- The Additional fields section has 4 fields:
- Photometry type: Kepler light curve files contain photometric data in two versions. The first is Simple Aperture Photometry (SAP), the second one is "Pre-search Data Conditioning Simple Aperture Photometry (PDCSAP). PDCSAP data are commonly better because systematic artifacts are usually removed from them. Sometimes, however, PDCSAP data are overcorrected, looking worse than raw SAP data. Peranso offers the capability to select Corrected (PDCSAP) or Raw (SAP) data. We will use Raw in this tutorial.
- Brightness as: Kepler obtained flux time series of individual targets, expressed in units of electrons per second. Peranso allows to convert flux values to the magnitude system, and offers the capability to select amongst both. In this tutorial we will use Flux.
- Show brightness-error bars: when selected, Peranso will display the error value of the brightness (flux or magnitude).
- Finally, the Marker size defines the size of the dots used for drawing the observations. Each dot represents one observation.
- Using the above values, we click the Plot button. Peranso subsequently connects to the Kepler survey database and retrieves all Datasets (light curve descriptions) whose coordinates match the coordinates of Star name, within the given search radius (expressed in arcsec), collected during the life span of the Kepler mission.
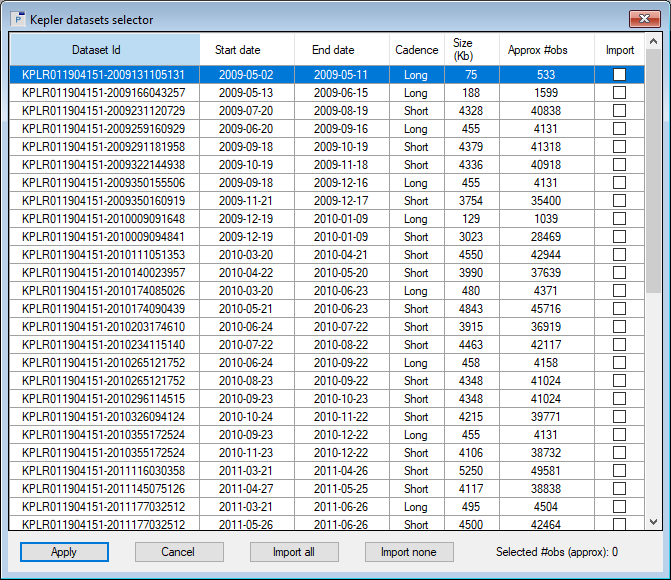
The matching Datasets are visualized in the above Kepler datasets selector form. It contains following columns:
- Dataset Id: the unique Kepler identification of the dataset.
- The Start date and End date between which the observations in the dataset were collected. You can sort datasets by start (or end) date by clicking the resp. column header.
- Cadence: Kepler light curves come in two flavors - long cadence (LC) and short cadence (SC) datasets, with effective integration times of 30 minutes and 1 minute respectively. Short cadence light curves have better time-sampling, but lower signal to noise due to the shorter integration tome, and in addition may be more greatly affected by systematics than the long cadence light curves. Click the column header to group all datasets according to their cadence type.
- Size (Kb) and Approximate number of observations (Approx. #obs) provide information about the size of the dataset. Note that the number of observations is an approximation for the exact number of observations in the dataset.
- Import: click the checkbox to select the corresponding dataset for import in the ObsWin. You can select multiple datasets. The approx. total number of observations that will be imported is displayed at the bottom right corner.
Next, there are 4 buttons in the Kepler datasets selector:
- Apply: clicking this button will download all datasets marked in the Import column and display them in the ObsWin. If Kepler datasets were present in the ObsWin prior to clicking the Apply button (e.g., from a previous Apply operation), the contents of the ObsWin will be updated such that only datasets with a corresponding checkbox selection in the Import column are shown.
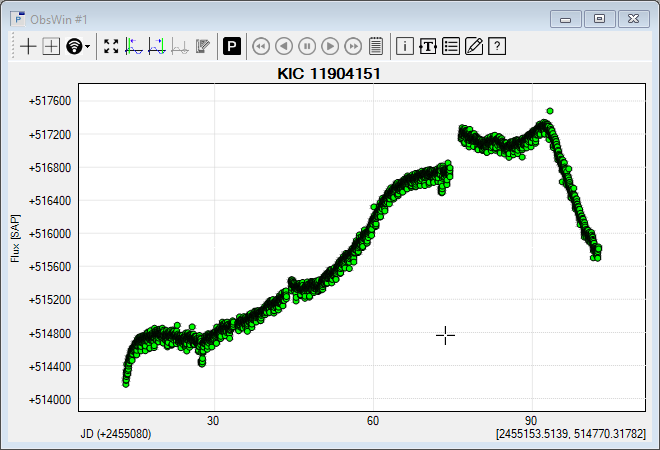
Each dataset is imported in a separate Observation set. Using the navigation bar buttons of the ObsWin toolbar makes it very convenient to step through the Kepler datasets in an ObsWin.
IMPORTANT: the time of a Kepler observation is expressed in BKJD (Kepler Barycentric Julian Day), namely at the mid-point of the cadence. Upon importing the observations in an ObsWin, Peranso converts the time from BKJD to (Geocentric) Julian Day.
- Cancel: closes the dialog box without further action.
- Import all: selects all checkboxes in the Import column.
- Import none: deselects all checkboxes in the Import column.
- For this tutorial, we will select the Dataset with identifier KPLR011904151-2009350155506, obtained between 2009-09-18 and 2009-12-16. It is a long cadence dataset with approx. 4131 observations. Click the checkbox in the Import column and then press the Apply button. The ObsWin will look as follows:
|